Wednesday, August 29, 2012

From Tree to Bench

We had a huge tree to fall down on our land.  It was big.  Big, big.  Huge. Enormous. Did I mention it was big?  It wouldn't fit in most sawmills in our area.  After exploring several avenues for getting it cut, the better half found someone who could get it cut down to make a bench out of it.

I didn't get a pic of it before it was cut for us but here is a pic of it as I was applying Cabot's Australian Timber Oil on the bark side. 


Here is a pic of the sanded side (seat) before I applied the timber oil to it.

 
Here you can see the difference from the end, which has been coated in the oil, and the top, which is about to be covered. 

 
Cabot's Australian Timber Oil


As soon as it cures properly I will post pictures of the finished bench in the yard!
 
Ok, as promised here are some pictures of the finished bench.  I let it cure while I did some "research" at the beach (wink wink)!


Of course my helper didn't want to miss a photo opportunity!


 I hope you like how it turned out.  It was a learning experience for me.  I am loving how it looks in the front yard. 
Stay tuned for the next project!  God Bless!


Sunday, August 26, 2012

Window Privacy with Style!

I was at the Country Living Fair in Columbus, OH last September and discovered Rustoleum Specialty Frosted Glass.  If case you haven't discovered the many products offered by them, check out their website here:  www.rustoleum.com.   

I had been trying to decide what to do about my bathroom windows.  I didn't want blinds and I didn't want curtains and I didn't want a valance and . . . well, you get the idea.  But I needed something for privacy.  When I saw this product at the Rustoleum vendor tent I was thrilled.  I didn't want permanently etched glass and this would give me the look without the expense and commitment. 

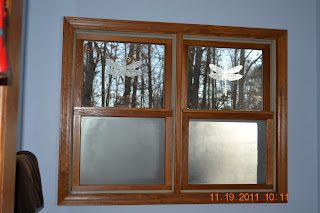
I decided to completely cover the bottom for privacy and cut out a stencil with a design for the top.  This way, I could have the view from outside hidden and not block out the outside light.  I decided to "etch" a dragonfly on the top. 

I searched the internet for a design I liked.  No luck there.  What I did find, however, was two different designs that I could use to create my own.  I enlarged the design on a copier in order to get it to the right size for the window.  This took some measuring and trial and error, but I got the size I wanted.

Next, I took my Contact paper and taped it down on several layers of cardboard.   Then, I took the two copies of my dragonfly from the copier and taped one of them down over the Contact paper.  I then took my exacto knife and began the process of cutting out the dragonfly.  This took some patience and time.  If you have a Silhouette Cameo machine you can use it to cut your stencil.  I now have one and boy, I sure wish I had bought it BEFORE this project!!

Now came the yucky part of the project - cleaning the windows and masking them off.  You want the windows clean so that the spray goes on well.  A word of advice here - take extra care when masking off your windows.  You don't want to have another project to do when you complete the windows - removing overspray from your walls, carpet, etc.  I was lucky in that my windows come out of the frame and I was able to take them down, clean them, and work on them in my workshop.  If you aren't able to do this, take the extra time to cover all areas well before you begin spraying.

The windows turned out great!  The best part is that if I decide to change the windows, all I need to do is remove the designs with some fingernail polish remover! 

What do ya think? 


Friday, August 24, 2012

Typewriter Table Re-do!

Ok, so a while back I saw a picture on Endless Treasures' website of a super cute typewriter table that they had for sale.  I fell in love with it and said so on their FaceBook page.  My sweet mom saw the post and told me that she had one from ages ago a few years ago and offered it to me.  See, I told you she was sweet!!  Anywho, it needed some TLC and I decided to try to polish and shine it up myself. 


 Here is a picture of the table that my mom had been storing in her utility room.


A close-up of the top.  See those scratches?  I think I can fix that . . . .


Why, yes, that is a mud-dobber's (at least that's what we call them down south!) nest you see on the underside of one of the fold-down sides!!

So, I started by bouncing some ideas off my better-half.  I first thought I would strip the entire thing and then prime and paint it.  He wasn't feeling it, I could tell.  He thought that would be too much work for the outcome.  So, after cleaning it with soap and water, I grabbed some sandpaper.  This is not my favorite thing to do, but to get a really nice finished project, it is SOOOOOO important.  I used a 220 grit sandpaper from 3M.  Their paper holds up to the job and I don't have the gumming up with it like I do with other papers. 

Next, I bought some scratch and small dent filler at my local auto supply store.  I applied it, let it dry, and then sanded again.  Here are pictures after the scratch filler was applied. 


After cleaning all of the dust off of the stand, I primed it.  This will give the final paint a smoother finish. 

Here is pic of the primed stand.  Woot Woot, now I can paint!!  I am so excited! 


Monday, August 20, 2012

Hello and welcome to my blog!  I am a mom, wife, sister, and daughter.  I love animals, enjoy working in the yard and traveling.  Sit back and enjoy your visit here!